HOW TO INSTALL LIGHTROOM DNG PRESETS IN
LIGHTROOM MOBILE APP
Preset installation guide for Lightroom DNG Presets
(DNG files only)
READ MANUAL
FIRST METHOD DROPBOX (desktop)
1. Download Lookfilter Presets from your order confirmation email and store the zip folder on your desktop. In this example we've downloaded the new "Singular Preset Pack".
2. Extract the zip folder and upload the Preset Folder named "LR-Mobile-DNG" to Dropbox.
3. Open the Dropbox mobile App on your mobile device.
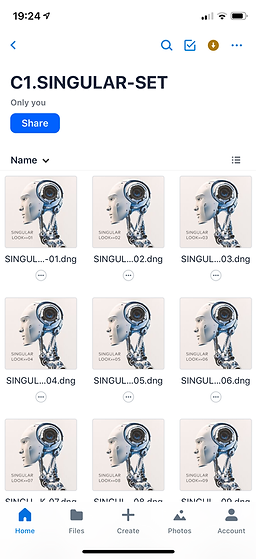
4. Locate the folder "LR-Mobile-DNG" and open it. (Don't be confused we've renamed our folder before the upload).
5. You'll see all DNG Presets in this example 15 Presets.
6. Click on the check mark upper right corner and select the Presets you want to export (save).
7. Click "Export" and then select "Save Image".


8. Your DNG Preset files are now saved to your Camera Roll. (Don't be confused you'll see blank images without any information).
9. Open Lightroom Mobile App and select the folder "All Photos".
10. Click the import image icon lower right corner. The DNG Presets will show up within your Camera Roll (small DNG icon).


11. Select the three dots "°°°" upper right corner and click on "Select".
12. Select all DNG Presets and click on "Add Photos". Finally your DNG Presets will show up including a name and number if it's a Bundle.


13. Select a DNG Preset.
14. Select the three dots "°°°" upper right corner and click on "Create Preset".
15. Select the settings you want to copy. Our Mobile Presets don't include adjustments within "Tools, "Optics" and "Geometry". You can uncheck these settings.


16. Choose a Preset name or use the Lookfilter names and numbers. You'll find each Preset name on the DNG Sample Image.
17. Choose or create a new Preset Group (highly recommended).
18. Click the check mark icon upper right corner to save the Preset.


19. Your new Preset is now ready for editing.
20. Repeat Step 13-18 for each DNG Preset you want to install.
SECOND METHOD FREE iZip App (mobile)
1. Download and install the free mobile App iZip for iOS or Android.
2. Download Lookfilter Presets from your order confirmation or one of Lookfilter's "Free Mobile Presets".
3. A zip file will download including all Presets.
4. Click on "Open in..." and select the App (iZip) by "Copy to iZip".
5. iZip will open and ask you if you'd like to unzip all files click "OK".
6. Locate the folder named "LR-Mobile-DNG" and select the Presets you want to import.
7. Click on "Open In" lower right corner and select "Save to files".
8. Select a folder where you want to store the DNG Preset files, for example ( iCloud Drive, On your phone, Dropbox).
9. Open Lightroom Mobile App.
10. Click on the "+" icon and create a new album.


11. The new Album is empty, select the three dots "°°°" upper right corner and click on "Add Photos" >> "From Files".
12. Select the folder where you've store the DNG Presets.
13. Select the DNG Preset / Presets.


14. Your new DNG Preset is now saved within the new album.
15. Select a DNG Preset and create a Preset - follow the Steps 14-18 (First Method) and repeat these Steps for each Preset you want to create.
Buy this Singular Collection >> Visit Preset Shop
You work with a different Lightroom version?
Choose the appropriate instruction.
Select installation guide for:
Lightroom Classic CC (Latest version .xmp & .lrtemplate Preset files)
Lightroom CC Desktop App (.xmp & .lrtemplate Preset files)
Lightroom CC Mobile App (Via Creative Cloud & sync)
Lightroom 4-5-6 (only older .lrtemplate Preset files)
Adobe Camera Raw (.xmp files)


